Last Friday i finished my course of the Advanced Diploma of Screen and Media at the Academy of Interactive Entertainment! We have an industry showcase coming up this Thursday, and our graduation in a week. I'm currently going back through projects I've done this year and getting our some proper renders, turntables and finishing things off.
Today I'm making turntables for some of my main assests from my mid year short film. Here is some of the still renders...
Since we have mostly wrapped up production of our end of year short film, I have been continuing work on the Windsor Hotel for my next year project. I finished the base model today, so here are some renders! Still a lot of detailing to do, but I will continue work on that in about a months time. For now I'll be back to portfolio work.
This tutorial will cover how to make a 360 degrees turntable render for an asset or model made in Maya 2015. I am using Arnold Renderer for this, but this will work with any Rendering engine. I will be using Premiere to export the footage, but this can be done in any video editing software.
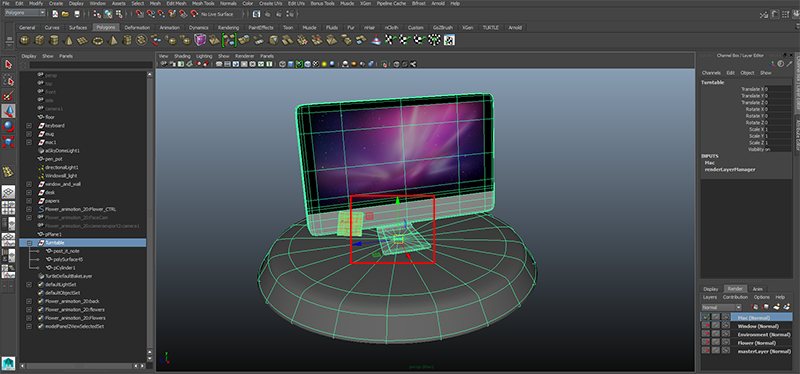
Start off by opening up whatever you want to make into your turntable. If this is in a scene with other props, then make a new render layer for it as I have, by clicking the 'Create new layer and assign selected objects' button that I have highlighted. I named this render layer Mac since that is what I am rendering, so note that if you see this term come up again this is not because I am doing this tutorial from a Mac computer, however this tutorial will transfer between PC and Mac. Also make sure that this render layer is the only thing ticked on to render.
Next make a podium for your model to sit on. This can be as fancy as you like and even textured, but I've kept mine simple for this tutorial. It's best to use a cylinder however so it turns nicely. Then put your model on it and make sure it is centered on the podium.
Next you'll want to group the podium and assets together. Do this by hitting Ctrl + G. You'll see this be now grouped in your Outliner. From now on you'll want to only select the Group via the Outliner, rather than the individual models from the Viewport.
Next you'll want to center your rotation axis so it rotates from the center of the podium. To do this click on your manipulators, and then hold down D to move the manipulators, and V to make it snap. You'll want to snap it to the center of your podium.
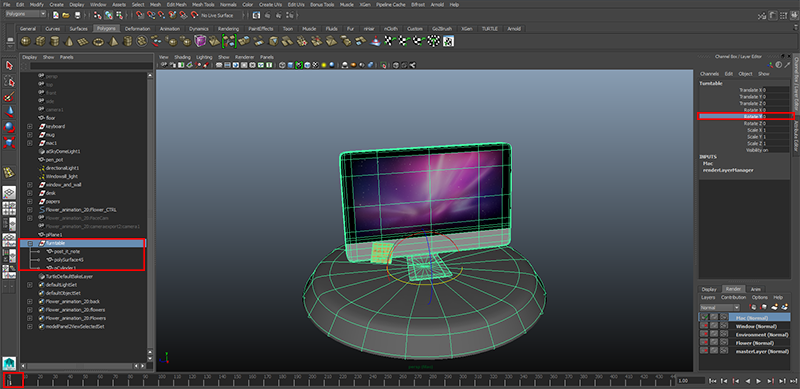
Next, making sure you have the group selected, and making sure you are at frame 1, you'll want to select the Rotate Y field in the Channel Box.
You'll want to leave it at 0, and then right click and hit Key Selected.
Next go to frame 120, and type in 360 into the Rotate Y field. Again hit Key Selected.
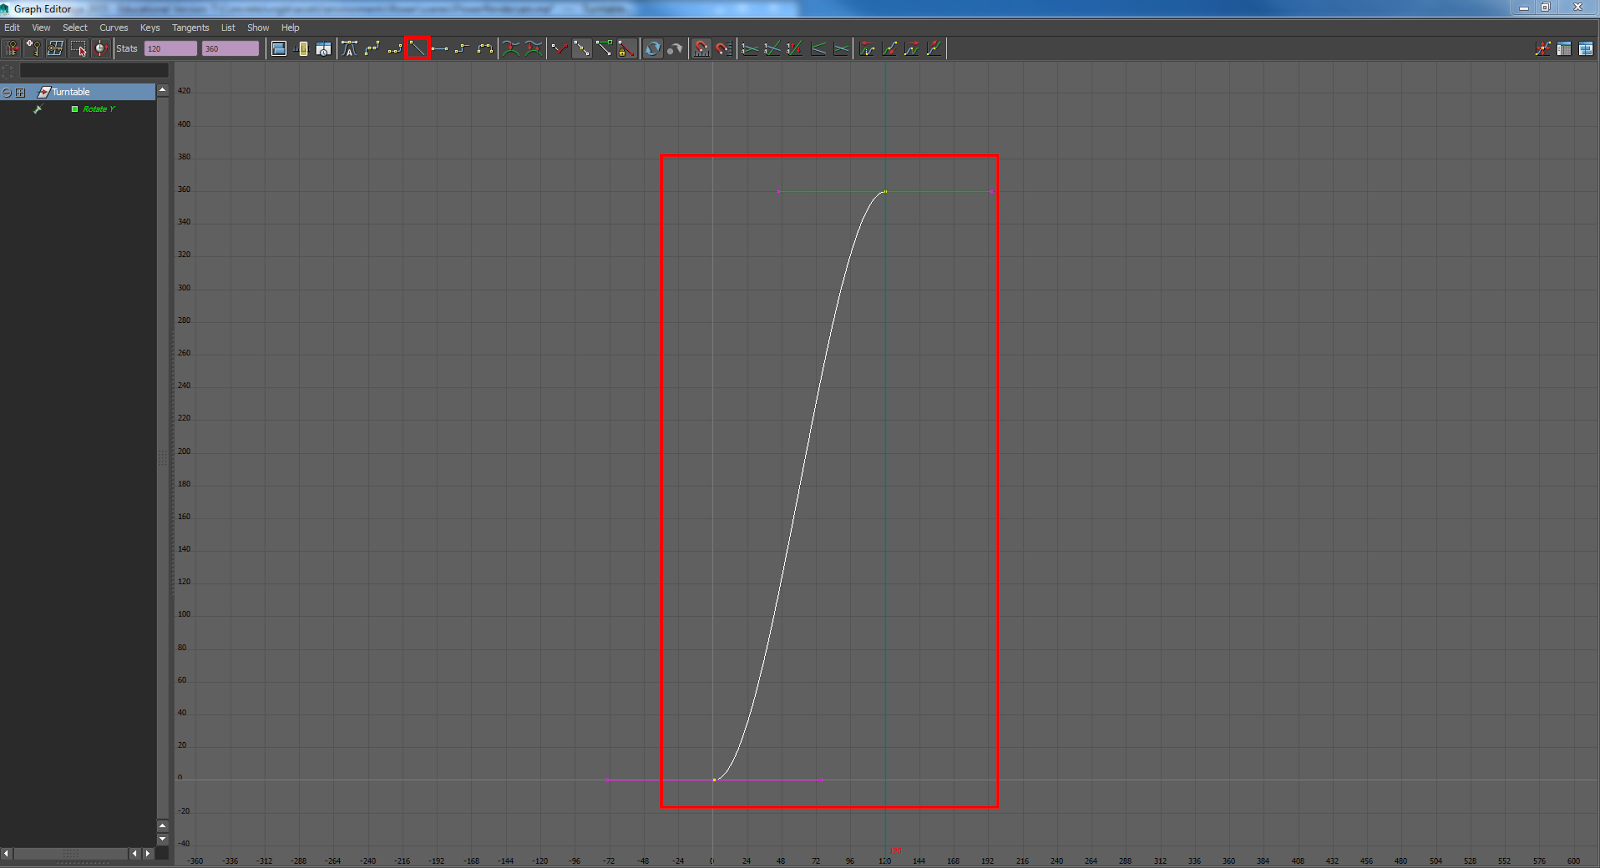
Next you'll want to go to Windows > Animation Editors > Graph Editor.
In the Graph Editor select the curve and then hit the button that is highlighted.
This will straighten the curve out. If you don't do this then the turntable will start slow, quicken in the middle, and then slow down again before ending. If you straighten it it will mean the turntable will be the same speed throughout which I personally prefer. You can play your animation now in the viewport and see if it works (it should turn from the center of the podium).
Next make sure to hit Real Time under Playback Speed in the Preferences settings. You can find this via the button on the far right under the frames in the Wiewport.
Almost done! Now you'll want to make a camera if you haven't already and position your model and podium so they are centered (mine is not here so I had to go back and fix this).
Set up your render settings however you want. I made sure to check it was rendering my correct Render Layer, I renamed the file and chose to do it as a TIF file (even though it says EXR below, EXRs are not compatible with Premiere). I choose name_#.ext for my extension details, and a frame padding of 3. Make sure to make the start frame 1 and end frame 120, and render from the correct camera. I had mine render as a HD_540 since this was just for the tutorial.
Do a test render to make sure everything is working and throw in some lights if you haven't already. I can't really see the outline of my Mac since it is black and so is the background, but I know this will render out with a transparent background so it isn't an issue. Again I forgot to center this so I had to go back and fix it.
When everything is ready and rendering out well in the Render View, go to Rendering > Render and hit Batch Render.
When the renders are done depending on your extension it should render out with a transparent background. Open up a frame to make sure it looks okay in Photoshop.
Since I want a background for my turntable I added that in behind it with the bucket tool and a new layer. I then saved the background out separately without the Render so I can put this into Premiere as a new layer.
After that it is pretty self explanatory. Import your frames into Premiere as a sequence, and then import the background in as a layer behind it.
Then export it out with whatever render settings you desire, here are mine.
And ta da! You have a turntable you can use for your portfolio. Upload it to YouTube to show it off. Mine is below..
For some final touches and to make it more personal I usually add my name and a black border as a top layer in Premiere so everyone will always know it's your work.
Over the next few weeks I'll be clearing out my notebook from my first year classes, so any notes I feel are still relevant and useful to me I'll be writing up here in tutorial format that others can follow. Enjoy!
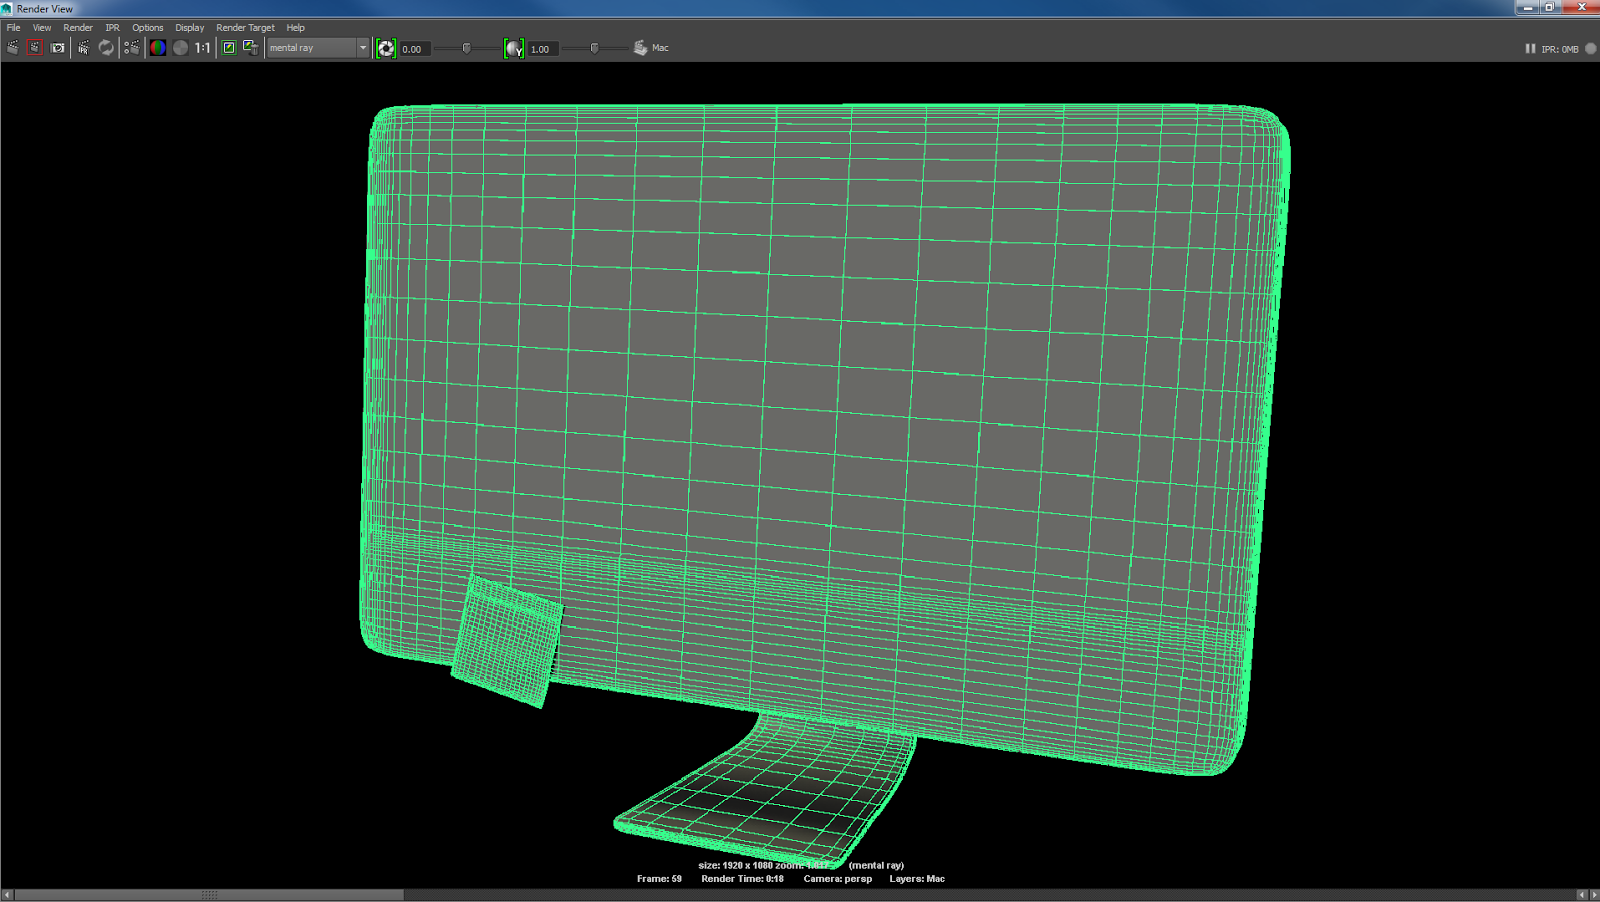
This tutorial will cover how to render wireframe in Maya 2015 using Mental Ray. There are a number of other ways to render wireframe in Maya but this is my personal favorite and what I consider best.
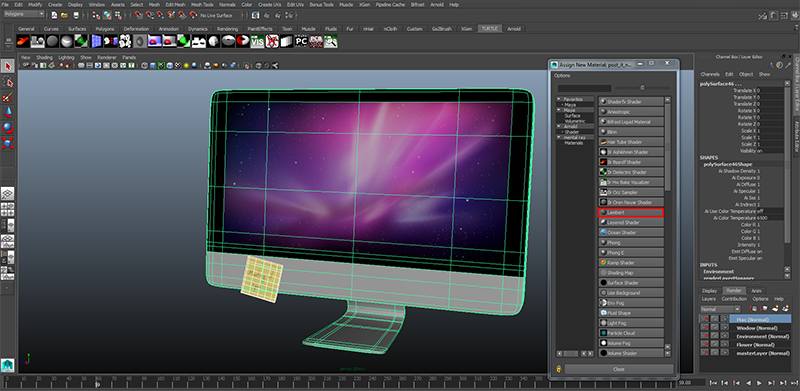
To begin grab whatever asset or model you wish to render. I'll be using this Mac I made for an environment. Since it is still in its environment in this scene I have added it to a new render layer by selecting it and the post-it note and clicking 'Create new layer and assign selected objects' button above what is highlighted in the below screenshot. I named the layer 'Mac', so if that comes up again in this tutorial note that it is not because I am doing this on a Mac computer (although this tutorial will transfer between PC and Mac). If you asset is alone in its scene you don't need to do this.
Next I'll make a new material for the asset, by going to Assign New Material and choosing Lambert. This is because I want my Breakdown to go from Lambert, to wireframe, to textured, however you can follow this tutorial applying the wireframe to the textured model, rather than creating a new Lambert texture.
In the Lambert's Attribute Editor click on its Shader Attributes tab. From there click on the Mental Ray tab.
Then go to the Contours tab, and turn on Enable Contour Rendering. From there you can use the 'Colour' tab to choose the colour of the wireframe, and use the Width to change the width of the lines (I usually use around .6 but it's up to your preference).
Next go into your render settings and make sure you are using Mental Ray (and rendering on the right layer if you are using them). Then go to the Features tab and then Contours tab.
Hit Enable Contour Rendering in the Contours tab and then under the Drawn by Property Difference tab hit Around all poly faces.
Lastly, go to the Quality tab and hit Legacy Sampling Mode under the Sampling Mode options.
Then make a camera if you need one or render from perspective, add some lights, and hit render. This should render your wireframe! Keep in mind if your asset is on smooth mode it will show the extra edge loops that are normally invisible in the Maya viewport. Hence making your render look like it has more wireframe than it really does.
To fix this just take it off of smooth mode.
If you want to render just the wireframe without the Lambert (which is particularly useful as you can then composite over the Lambert renders with the wireframe renders in Photoshop / Premiere / Nuke so you can turn it off and on easily) hit Hide Source in the Render Settings.
Which removes the material and leaves you with just the wireframe.
And ta da! Save this out as a PNG and this will make the black transparent so it can be easily put over the Lambert or Material renders.
Here is the production breakdown video I made for my assessment (which strangely required lighting concepts and design which is why they are quickly thrown in at the start) that features breakdowns for two of my favorite shots from the film. I created everything seen aside from the final lighting and fish model. Next week I'll be creating a full breakdown of everything I did in the film.
Today we released the three social media sites we had been slowly working on over the course of production! Please check them out and like or follow them if you can...
In other news, I started on portfolio renders today! Can't wait to add them to my website. Fish was modelled by Sam Cottle, lighting done by Dan Stewart. Everything else by me!
Today I jumped onto the current hype train with my free time and started playing Fallout 3. I then decided to draw a portrait of my character! With my 3D study I don't have much time to draw characters in 2D since I'm not a character artist, so I'm a little rusty, but I'm hoping to get back into it this holidays as I did last!
About mid way through the year we had to write an essay on a research subject, I chose texturing and this is the video I made to go along with the essay:
The essay is below the cut, it is the first I have written since High School and I am pretty proud of it, a lot of the information I couldn't fit into the video is there.
The last week or so I have been also working on a side project with a friend which is an exact scale replica of the Windsor Hotel in Melbourne. I just finished the main body and am about to start on the top. Right now some of the final detail parts have placeholders.
I just finished texturing the Bunny Slipper characters, meaning I have wrapped up all my production tasks for my final assessment, and well as my time at the Academy of Interactive Entertainment Screen Course! Exciting :)
We are now rendering our final project! It's been a pretty hectic last few weeks so I haven't been able to update very much, but here are a few test renders I have been doing for my environments. Can't wait to post my final renders when they are done.
In the midst of a house move right now, so have been taking a bit of time off from work, but am back at it today finishing off this desk environment for one of our short film shots... can't wait to see it with proper lighting!